วันพฤหัสบดีที่ 24 กุมภาพันธ์ พ.ศ. 2554

Lemon Frosted Lemon Cake Recipe


A Lemon Frosted Lemon Cake is sweet and buttery with a moist yet dense texture. This cake is similar to a pound cake and as its name implies, it has a tangy lemon flavor that comes from adding both lemon zest and lemon juice to the cake. The lemon flavor is also found in the lemon flavored frosting, made with confectioners sugar and lemon juice, that dries to a hard and crusty glaze. A lovely cake to serve in the afternoon with a hot cup of tea.
When choosing lemons look for ones that are fragrant with brightly colored oily yellow skins. If you can buy organic. The best lemons have firm, plump, and heavy for their size. Don't buy lemons that have blemishes, soft spots, or are hard and wrinkled. Lemons consist of a yellow outer rind (skin) that can be of varying thickness and graininess, and can have either a bumpy or a smooth texture. This outer skin is where most of the lemon's wonderful tangy flavor is located. Before removing the outer rind (zest) make sure you wash the lemon thoroughly (soap and water is best). When removing the zest do not remove the white membrane (pith) that is underneath as it is very bitter tasting. Once you have removed the outer rind, inside the lemon are small vessels called 'pulp vesicles' which contain the pleasantly acidic lemon juice and seeds. Squeezing the lemon by hand or with a lemon squeezer or reamer releases this clear tart juice. Always use fresh lemons to make lemon curd as the bottled lemon juice is a poor substitute and won't give you that wonderful sharp and refreshing citrus taste.
This lemon cake recipe is one that I find over and over again in some of my favorite English cookbooks. There is a recipe in Arabella Boxer's wonderful book Arabella Boxer's Book of English Food which is about British foods served before WWII. Another similar recipe for can be found in Jane Pettigrew's The National Trust Book of Tea-Time Recipes which pays tribute to present day tea rooms in the United Kingdom. But the recipe I use the most comes from the English food writer, Jane Grigson in her excellent book Jane Grigson's Fruit Book. Read more:

Lemon Frosted Lemon Cake Recipe


A Lemon Frosted Lemon Cake is sweet and buttery with a moist yet dense texture. This cake is similar to a pound cake and as its name implies, it has a tangy lemon flavor that comes from adding both lemon zest and lemon juice to the cake. The lemon flavor is also found in the lemon flavored frosting, made with confectioners sugar and lemon juice, that dries to a hard and crusty glaze. A lovely cake to serve in the afternoon with a hot cup of tea.
When choosing lemons look for ones that are fragrant with brightly colored oily yellow skins. If you can buy organic. The best lemons have firm, plump, and heavy for their size. Don't buy lemons that have blemishes, soft spots, or are hard and wrinkled. Lemons consist of a yellow outer rind (skin) that can be of varying thickness and graininess, and can have either a bumpy or a smooth texture. This outer skin is where most of the lemon's wonderful tangy flavor is located. Before removing the outer rind (zest) make sure you wash the lemon thoroughly (soap and water is best). When removing the zest do not remove the white membrane (pith) that is underneath as it is very bitter tasting. Once you have removed the outer rind, inside the lemon are small vessels called 'pulp vesicles' which contain the pleasantly acidic lemon juice and seeds. Squeezing the lemon by hand or with a lemon squeezer or reamer releases this clear tart juice. Always use fresh lemons to make lemon curd as the bottled lemon juice is a poor substitute and won't give you that wonderful sharp and refreshing citrus taste.
This lemon cake recipe is one that I find over and over again in some of my favorite English cookbooks. There is a recipe in Arabella Boxer's wonderful book Arabella Boxer's Book of English Food which is about British foods served before WWII. Another similar recipe for can be found in Jane Pettigrew's The National Trust Book of Tea-Time Recipes which pays tribute to present day tea rooms in the United Kingdom. But the recipe I use the most comes from the English food writer, Jane Grigson in her excellent book Jane Grigson's Fruit Book. Read more:

Lemon Cupcakes Recipe


I never tire of these Lemon Cupcakes that take vanilla cupcakes and fills them with lemon curd and then frosts each with lightly sweetened whipped cream. If you like, you can sprinkle the tops with colored or pearl sugar or garnish with a fresh berry or even a candied lemon slice.

This Lemon Cupcake recipe begins with a delicious vanilla cupcake that gets its' lemon flavor from adding lemon zest to the batter. (Lemon Zest is the yellow outer skin of the lemon that contains the fruit's flavor and perfume.) Once the cupcakes have been baked and cooled, a hole is made in the center of each cupcake and filled with a small dollop of lemon curd. Lemon Curd is a thick, soft and velvety cream that has a wonderful tart yet sweet citrus flavor. It is made with eggs, sugar, lemon juice, lemon zest, and unsalted butter and it is similar to a lemon filling or custard in that it is cooked on the stove. You can make your own (recipe included) or you can use store bought. You only need about 1/3 cup of lemon curd so there will be leftovers, which you can use as a spread on scones or to fill pies, cakes, or tarts.
A cupcake always needs frosting and for this Lemon Cupcake I have simply used whipped cream. The trick to making this cream is to first use heavy "whipping" cream, that is cream with a 36-40% butterfat content. And you also need to chill the ingredients, bowl, and whisk as this ensures that the cream will reach its maximum volume when beaten. Now, you could just cover the cupcakes with a thin layer of frosting using a knife or offset spatula, which is perfect for the kids. But if you want swirls of frosting, use a piping bag fitted with a Wilton 1M star decorating tip. Read more

Yellow Cupcakes Recipe


If I give my kids the choice between a slice of cake and a cookie, they will choose a cookie every time. But if the choice is between a cupcake and a cookie, that is an entirely different story. There is something so appealing about having your own little cake that you do not have to share. In my home, this chocolate frosted, moist vanilla flavored Yellow Cupcake is the most popular. It is delicious and they look lovely covered with shaved chocolate or colored sprinkles.

Now, while you don't have to line your muffin pan with paper bake cups, who doesn't like to peel back the paper to see what surprise lies beneath. And, for the baker, they make the cupcakes easy to release from the pan and clean up a breeze. When I found this Yellow Cupcake recipe in Baking Illustrated by the Editors of Cook's Illustrated Magazine, I immediately knew it was a keeper. This cake batter is unusual in that you simply 'dump' all the dry ingredients into your mixer, then all the wet ingredients (all at room temperature), and beat them together. That is it. The result is a dense and moist yellow cupcake that is perfect especially when frosted. There are many types of frosting you could use to ice these cupcakes. Confectioners Frosting would be nice, but I especially like this rich and creamy chocolate fudge frosting which pairs so nicely with the vanilla flavored butter cake.
This chocolate fudge frosting recipe comes from the cookbook Chocolate Bar by Matt Lewis and Alison Nelson who run a chocolate boutique in New York that they call a "candy store for grown-ups". It is the type of chocolate frosting my mother always used to cover cakes. Made with butter, confectioners (icing or powdered) sugar, vanilla extract and unsweetened chocolate, it is perfect for covering cupcakes. It uses unsweetened chocolate which is also known as baking, plain or bitter chocolate. This is chocolate in its rawest form. Chocolate liquor that has been refined and contains 50-55% cocoa butter. Since no sugar has been added to the chocolate it has a strong, bitter taste that is used in cooking and baking but is never eaten out of hand. When used in this frosting it imparts a deep chocolate flavor. Read more:

Coconut Cupcakes Recipe


When I was deciding which cupcake recipes to have on the site, Coconut Cupcakes were at the top of my list. I love both the look and flavor of these little buttery cakes topped with tangy cream cheese frosting and flakes of sweetened coconut. It is easy to see how they got their pet name, Snowball Cupcakes.
Coconut Cupcakes start with white cake. This is a sweet and buttery flavored cake that is mixed together using the 'combination' method. This method is almost the same as the 'creaming' method, where the butter and sugar are beaten together, followed by adding the eggs, flour, and liquid. The only difference is that with the combination method, the eggs are separated. The egg yolks are added to the butter and sugar mixture (like with the creaming method), but the egg whites are beaten separately and are folded into the batter at the end. This produces a cake with additional volume and lighter texture than with the 'creaming' method. Once the cake batter is made it is divided among 12 muffin cups and baked. The cupcakes need to be completely cooled before they are frosted. Now, there are many frostings you could use on this buttery white cake, but I decided to use a cream cheese frosting. It has a smooth and tangy flavor which seems the perfect accompaniment to, not only the cake, but the coconut garnish. You can use either sweetened (flaked or shredded) or unsweetened coconut to garnish these cupcakes. If you would like toasted coconut simply bake the coconut in a 350 degree F (177 degree C) oven for a few minutes until nicely browned. Be sure to watch the coconut closely as it burns very easily.
For a little trivia, the name "cupcake" was used differently back in the 1800s. Then the name "cup cake" simply referred to a cake where the ingredients were 'measured' not 'weighed'. It seems that before the 1880s ingredients for cake baking were actually weighed so when recipes started to be given in 'cup' measurements, the cake recipes were named 'cup cakes' to reflect this difference. Greg Patent also tells us in his book 'Baking in America' that a woman named Mrs. Rorer (in 1902) was the first to actually print a recipe for the cupcakes (with frosting) we all enjoy today. Read more:

White Cupcakes Recipe


Cupcakes are described as individual cakes that are baked in muffins cups lined with paper or foil baking cups. They come in a variety of flavors and are usually frosted with icing and sometimes garnished with sprinkles. While this definition sounds about right it does not describe how delightful cupcakes look and how delicious they taste. As you have probably noticed cupcakes have taken the country by storm. Bakeries offer us every possible flavor combination you can imagine, but the classic sweet and buttery White Cupcake frosted with swirls of creamy smooth Confectioners Frosting remains a favorite.

Like the Coconut Cupcakes, these White Cupcakes start with a white cake batter. This cake is sweet and buttery and is mixed together using what is called, the 'combination' method. That means, while the butter and sugar are creamed together, followed by adding the eggs, it is only the eggs yolks that are added. The whites are beaten separately and folded into the batter after the flour and liquid have been incorporated into the batter. This gives you a cake with good volume and light texture. Once the cake batter is made it is divided among 12 muffin cups and baked. I like to line the muffin cups with paper liners as it adds to the cupcake's appeal, keeps the cupcakes from drying out, and makes cleanup easier. The cupcakes need to be completely cooled before they are frosted. For these cupcakes we are using a Confectioners Frosting which is made with confectioners sugar (also known as icing or powdered sugar) along with butter, vanilla extract, and milk. It is easy to make and has a wonderfully light and fluffy texture with a sweet and buttery flavor. Now, you could just cover the cupcakes with a thin layer of frosting using a knife or offset spatula, which is perfect for the kids. But when you want something fancier, bring out the piping bag fitted with a plain (used here) or decorative tip. To dress them up even more, garnish with colored sprinkles which gives the cupcakes a welcome crunch.

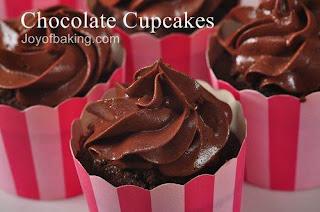
Chocolate Cupcakes Recipe


This lovely Chocolate Cupcake is all about having your own little cake that you do not have to share. Did you know that the name "cup cake" was first used, not to describe its size, but to how the cake's ingredients were measured? It seems that before the 1880s ingredients for baking cakes were 'weighed' so when recipes started to be written with 'cup' measurements, they were named 'cup' cakes to reflect this difference.
Fast forward to today and cupcakes are now individual cakes that are baked in either muffin pans or in cup-shaped molds. They are usually topped with a frosting and candy sprinkles are entirely optional.
Cupcakes may come in many flavors, but chocolate and vanilla are still the most popular. With that in mind, I give you my favorite Chocolate Cupcake recipe. This recipe produces a Chocolate Cupcake with a moist texture and mild chocolate flavor that comes from using Dutch-processed cocoa powder that has been dissolved in hot water to bring out its full flavor. Of course, no cupcake is complete without a frosting, and for these cupcakes I have used a rich and creamy chocolate fudge frosting.
The frosting recipe comes from the cookbook Chocolate Bar by Matt Lewis and Alison Nelson who run a chocolate boutique that they call a "candy store for grown-ups" in New York. It is the type of chocolate frosting my mother always used to cover cakes. Made with butter, confectioners (icing or powdered) sugar, vanilla extract and unsweetened chocolate, it is perfect for piping lovely swirls. It uses unsweetened chocolate which is also known as baking, plain or bitter chocolate. This is chocolate in its rawest form. Chocolate liquor that has been refined and contains 50-55% cocoa butter. Since no sugar has been added to the chocolate it has a strong, bitter taste that is used in cooking and baking but is never eaten out of hand. When used in this frosting it imparts a deep chocolate flavor. Read more:

Carrot Cupcakes Recipe


With the popularity of cupcakes exploding, it goes without saying that we must have a Carrot Cupcake recipe in our repertoire. These Carrot Cupcakes are moist and delicious, and are full with the flavors of carrot, apple, ground cinnamon, walnuts, and raisins. While Sylvia Lovegren tells us in her book Fashionable Food that carrot cakes were once glazed with a fruit sauce, today we prefer a smooth and tangy cream cheese frosting.
Cupcakes can be made with most cake batters, with no adjustments needed except for the baking time. This rule applies to these Carrot Cakes. On average, cupcakes will bake in about 18 - 20 minutes or until a toothpick inserted in the center of one comes out clean. I love this Carrot Cupcake recipe because it does not involve pulling out the mixer. All you need are two bowls, one for the wet ingredients and one for the dry ingredients. The two are then mixed together and you are done. The time consuming part is the grating of the carrots and apples. These cupcakes have a moist texture and are full of flavor. Frosting them with a cream cheese icing provides a wonderful contrast of textures and flavors.
Carrot Cakes became popular with the health food craze of the 1970s, although Jean Anderson in her American Century Cookbook says recipes began to appear as early as the 1920s. There are many theories on the origin of this cake, some say it descended from the English's baked carrot puddings or European steamed carrot puddings. Others say it may have come from German carrot breads. Alan Davidson in 'The Oxford Companion to Food' tells us that carrots were used in European sweet cakes since the Middle Ages when other sweeteners were hard to find or just too expensive. In fact, carrots, along with beets, contain more sugar than most other vegetables which might explain their use in desserts.Read more:

Carrot Cake Recipe


Carrot Cake never goes out of style. One bite will tell you why. This rich and moist spice cake, full of grated carrot and toasted nuts, has great flavor, especially when covered with a tangy and sweet flavored cream cheese frosting. The interesting part is that while those pretty orange flecks of grated carrot give the Carrot Cake color and texture, along with sweetness and moisture, its' flavor is almost indistinguishable. I think the biggest debate surrounding the Carrot Cake is whether crushed pineapple or applesauce should be added to the batter. Adding either of these ingredients will give the cake more flavor and moisture, so if you like, add 1/2 cup of either crushed pineapple or applesauce to the batter, right along with the oil and vanilla extract. Take note, though, that you may need to bake the carrot cake a few minutes longer than the recipe states.

Although using carrots in baking may seem odd, Alan Davidson in 'The Oxford Companion to Food' tells us that carrots were used in European sweet cakes since the Middle Ages when other sweeteners were hard to find or just too expensive. In fact, carrots, along with beets, contain more sugar than most other vegetables which might explain their use in desserts.
Speaking of carrots, the orange carrots we enjoy today originated from the purple variety grown in Afghanistan since the 7th Century AD. As carrots moved westward into Europe the orange variety came about and this is the variety the English settlers brought to America. 'Carrot' comes from the Greek word "karōton" and the Greeks started the belief that eating carrots would improve your eyesight. John Ayto in "An A-Z of Food & Drink" tells how during World War II the British furthered this belief by saying that British pilots improved their night vision by eating huge amounts of carrots. They were, however, only trying to encourage the eating of carrots as it was one of the few foods that were not in short supply during the war.
Note: For a more casual dessert you could bake this cake in a 9 x 13 x 2 inch (23 x 33 x 5 cm) pan. Just increase the baking time to between 30 to 40 minutes. Also if you would like to make this a four layer cake, as shown in the picture, just cut each cake layer in half horizontally so you have four layers. You will also need to double the cream cheese frosting recipe. The orange frosting on the top of the cake is cream cheese frosting colored with orange dye. Read more:

Carrot Cake Recipe


Carrot Cake never goes out of style. One bite will tell you why. This rich and moist spice cake, full of grated carrot and toasted nuts, has great flavor, especially when covered with a tangy and sweet flavored cream cheese frosting. The interesting part is that while those pretty orange flecks of grated carrot give the Carrot Cake color and texture, along with sweetness and moisture, its' flavor is almost indistinguishable. I think the biggest debate surrounding the Carrot Cake is whether crushed pineapple or applesauce should be added to the batter. Adding either of these ingredients will give the cake more flavor and moisture, so if you like, add 1/2 cup of either crushed pineapple or applesauce to the batter, right along with the oil and vanilla extract. Take note, though, that you may need to bake the carrot cake a few minutes longer than the recipe states.

Although using carrots in baking may seem odd, Alan Davidson in 'The Oxford Companion to Food' tells us that carrots were used in European sweet cakes since the Middle Ages when other sweeteners were hard to find or just too expensive. In fact, carrots, along with beets, contain more sugar than most other vegetables which might explain their use in desserts.
Speaking of carrots, the orange carrots we enjoy today originated from the purple variety grown in Afghanistan since the 7th Century AD. As carrots moved westward into Europe the orange variety came about and this is the variety the English settlers brought to America. 'Carrot' comes from the Greek word "karōton" and the Greeks started the belief that eating carrots would improve your eyesight. John Ayto in "An A-Z of Food & Drink" tells how during World War II the British furthered this belief by saying that British pilots improved their night vision by eating huge amounts of carrots. They were, however, only trying to encourage the eating of carrots as it was one of the few foods that were not in short supply during the war.
Note: For a more casual dessert you could bake this cake in a 9 x 13 x 2 inch (23 x 33 x 5 cm) pan. Just increase the baking time to between 30 to 40 minutes. Also if you would like to make this a four layer cake, as shown in the picture, just cut each cake layer in half horizontally so you have four layers. You will also need to double the cream cheese frosting recipe. The orange frosting on the top of the cake is cream cheese frosting colored with orange dye. Read more:

Chocolate Butter Cake Recipe


This Chocolate Butter Cake has two layers of moist and tender butter cake that are sandwiched together and frosted with a satiny smooth chocolate frosting. It is the cake I make for birthdays, anniversaries and other festive occasions. All the garnish it needs is pretty candles and maybe some colorful sprinkles or fresh berries.
What makes this chocolate cake unique is that we use both unsweetened chocolate and unsweetened cocoa powder to achieve its rich chocolate flavor and color. Unsweetened chocolate is also known as baking, plain or bitter chocolate. This is chocolate in its rawest form and is known by professionals as 'chocolate liquor'. This means that unsweetened chocolate is just ground cocoa nibs that have been refined and contain between 50-55% cocoa butter (cocao fat). This type of chocolate contains no sugar so it has a strong, bitter taste that is used in cooking and baking but is never eaten out of hand. Scharffen Berger has a very nice unsweetened chocolate that contains 99% cacao that you can find it in most specialty food stores. But you can also use the unsweetened chocolate that comes in squares that is stocked in most grocery stores. Besides the unsweetened chocolate, we are also using unsweetened (natural) cocoa powder (not Dutch processed) in this recipe. It has an intense bitter flavor that makes it well suited for use in chocolate cakes. When adding the cocoa powder to the cake batter, we first need to dissolve it in boiling water and this is done to bring out its full flavor. You may also notice that this recipe contains a little extra leavening (baking powder and soda) and this is to counteract the drying and strengthening affect cocoa powder has when used in batters.
Once the cake layers have been baked and completely cooled, they are frosted with a delicious chocolate butter frosting. Again, we are using unsweetened chocolate and this, along with unsalted butter, milk, vanilla extract, and confectioners (powdered or icing) sugar, makes a smooth and buttery chocolate frosting that contrasts nicely with the deep chocolate colored cake. Read more

Chocolate Cake Recipe


For a double dose of chocolate, there is nothing better than a chocolate frosted chocolate cake. This single layer cake has a moist and tender crumb with a rich and creamy frosting made with just chocolate and cream (Ganache). The kids will love it with a tall glass of cold milk while the adults might prefer it with a hot cup of coffee.
What makes this chocolate cake unique is that it is a "mix-in-the-pan" type of cake. That means all the dry and wet ingredients are mixed together right in the pan it is to be baked in. There are a couple of things about this recipe that are worth mentioning. First, it does not contain eggs. Second, this cake uses unsweetened (natural) cocoa powder (not Dutch processed) which is made from chocolate liquor that has been pressed to remove three quarters of its cocoa butter. The remaining cocoa solids are processed to make fine unsweetened cocoa powder. It has an intense bitter flavor that makes it well suited for use in chocolate cakes. Popular brands are Hershey's, Ghirardelli, Pernigotti, and Scharffen Berger. Third, we also add a little lemon juice (or vinegar) to the batter, which causes a reaction between the cocoa powder and the lemon juice giving the baked cake a red tinge (reminiscent of a Red Velvet Cake).
Once the cake has baked and cooled, I like to frost it with a Ganache frosting which is simply a mixture of heavy cream and semi sweet chocolate. Normally, to make a Ganache, you pour boiling cream over chopped chocolate and stir until smooth. Then, once the Ganache has cooled to room temperature, you simply pour it over the cake. Now, while this makes a lovely frosting, what you can also do is to let the Ganache cool until slightly firm, and then beat it until it becomes light and creamy. Same great taste but it has a slightly different texture which I find is perfect on this cake.
This cake recipe is adapted from Canadian Jane Rodmell's excellent cookbook Best Summer Weekends Cookbook. This is a cookbook that I turned to often, both for savory and sweet recipes. Her recipes are easy to put together and have excellent flavor.Read more:

Red Velvet Cupcakes Recipe


A Red Velvet Cake is so striking that I decided to take the batter and make individual-sized cupcakes. I really like how they look, with their swirls of fluffy white frosting against the garishly red cake. A few sprinkles of leftover cake crumbs is all that is needed to complete their look.

Now a Red Velvet Cake is really a Devil's Food Cake that has red food coloring added to it. Its' chocolate flavor is quite mild and that is because we only add 1 tablespoon of cocoa powder to the batter. Buttermilk is responsible for this cake's moist and tender crumb. You can buy buttermilk or buttermilk powder, or you can make your own by adding 1 tablespoon of white distilled vinegar, cider vinegar, or lemon juice to 1 cup (240 ml) of milk. Just let this mixture stand 5 to 10 minutes before using. The cake batter uses the creaming method, that is, beat the butter with the sugar until creamy, add the egg and vanilla extract, and then alternately add the flour mixture and buttermilk (mixed with the red food dye). The final step is to add a mixture of baking soda and vinegar. Because baking soda starts to react with the batter right away, try to get the cupcakes into the oven as quickly as possible. In the past I made very large billowing cupcakes, but I now like them smaller so I have adjusted this recipe to make 12 cupcakes.
Finally, the frosting, which is really what cupcakes are all about. The classic frosting for a Red Velvet Cake is cream cheese. But this cream cheese frosting is a little different in that it also contains heavy cream so you end up with a sweet yet tangy frosting, that is soft and creamy. The frosting recipe is adapted from 'The Waldorf-Astoria Cookbook' by John Doherty. You can simply spread the frosting on the tops of the cupcakes with an offset spatula or knife, but for a more eye catching cupcake, pipe lovely swirls using a Wilton 1M large open star decorating tip. Read more:

วันศุกร์ที่ 4 กุมภาพันธ์ พ.ศ. 2554

Red Beans with Wine Recipe


Surprisingly hearty, this red beans with wine recipe provides a substantial side dish or main course straight from France's rustic vineyard country. Kidney beans with wine are velvety smooth with a subtle, refined hint of red wine and a touch of bacon and onions. Make it into a meal with a crusty baguette, or serve it beside roasted chicken for a healthy dinner.
Cook's note: Use a very flavorful, full-bodied red wine for this red beans in wine recipe.
Prep Time: 8 hours
Cook Time: 3 hours
Total Time: 11 hours
Yield: 6 to 8 servings
Ingredients:
1 pound dried kidney beans
8 ounces lean bacon, chopped
1 onion, chopped
1 bouquet garni
6 cloves garlic
1/8 teaspoon ground cloves
6 cups water
1 1/2 cups dry red wine (strong flavored, full-bodied)
Salt and pepper to taste
Preparation:
Rinse the kidney beans and soak them for 8 hours in cold water.
Preheat the oven to 325F and drain the soaking water from the beans. Pour the beans into a large casserole dish. Place the bacon, onion, bouquet garni, garlic cloves, and cloves into the center of the beans and cover them with the 6 cups water.
Place a lid on the dish and bake the beans for 2 to 3 hours, until the beans are soft and most of the cooking liquid has evaporated. Remove the beans from the heat, discard the bouquet garni, and stir the red wine, salt and pepper into the casserole. Replace the lid and allow the beans to soak up the wine, at room temperature, for 45 minutes to 1 hour.
Serve the red beans with wine reheated or at room temperature.
This kidney beans with wine recipe makes 6 to 8 servings.

Red Beans with Wine Recipe


Surprisingly hearty, this red beans with wine recipe provides a substantial side dish or main course straight from France's rustic vineyard country. Kidney beans with wine are velvety smooth with a subtle, refined hint of red wine and a touch of bacon and onions. Make it into a meal with a crusty baguette, or serve it beside roasted chicken for a healthy dinner.
Cook's note: Use a very flavorful, full-bodied red wine for this red beans in wine recipe.
Prep Time: 8 hours
Cook Time: 3 hours
Total Time: 11 hours
Yield: 6 to 8 servings
Ingredients:
1 pound dried kidney beans
8 ounces lean bacon, chopped
1 onion, chopped
1 bouquet garni
6 cloves garlic
1/8 teaspoon ground cloves
6 cups water
1 1/2 cups dry red wine (strong flavored, full-bodied)
Salt and pepper to taste
Preparation:
Rinse the kidney beans and soak them for 8 hours in cold water.
Preheat the oven to 325F and drain the soaking water from the beans. Pour the beans into a large casserole dish. Place the bacon, onion, bouquet garni, garlic cloves, and cloves into the center of the beans and cover them with the 6 cups water.
Place a lid on the dish and bake the beans for 2 to 3 hours, until the beans are soft and most of the cooking liquid has evaporated. Remove the beans from the heat, discard the bouquet garni, and stir the red wine, salt and pepper into the casserole. Replace the lid and allow the beans to soak up the wine, at room temperature, for 45 minutes to 1 hour.
Serve the red beans with wine reheated or at room temperature.
This kidney beans with wine recipe makes 6 to 8 servings.

Chateaubriand Recipe


Chateaubriand is a juicy-on-the-inside, seared and roasted beef tenderloin with wine sauce frequently ordered for a table of two at French restaurants. This chateaubriand recipe is the traditional version of the restaurant favorite, seasoned very simply, roasted to perfection, and then sliced on the diagonal. Be sure to make the quick shallot and wine sauce and serve the meal with chateau potatoes for authenticity.
Prep Time: 10 minutes
Cook Time: 35 minutes
Total Time: 45 minutes
Ingredients:
1 center cut beef tenderloin (approx. 1lb.)
2 tablespoons butter
2 tablespoons olive oil
Salt
Ground black pepper
1 shallot, finely chopped
1/2 cup dry red wine
1/2 cup demi-glace
1 tablespoon butter, softened
2 teaspoons dried tarragon (1 tablespoon fresh)
Preparation:
Preheat the oven to 375F. Melt the butter and olive oil together in a large skillet set over medium-high heat until the mixture turns a bit cloudy and bubbly. Season the beef with salt and pepper to taste.
Place the meat in the pan and do not move it at all for at least 3 minutes. Using tongs, carefully turn the tenderloin on its side and brown it for 3 minutes. Repeat the same browning process on all exposed surfaces of the meat.
Place the tenderloin onto a rack in a roasting pan in the oven. Roast the beef 15 minutes for medium-rare, 20 minutes for medium, and 23 minutes for medium-well. Transfer the chateaubriand to a warmed serving platter, lightly tent it with a single layer of foil, and allow it to rest, untouched, for 15 minutes.
While the tenderloin is resting, make the wine sauce. Sauté the chopped shallots in the leftover pan juices in the skillet. Once the shallots are softened and translucent. Pour the wine into the skillet and bring the sauce to a boil, scraping up all the browned bits on the bottom of the pan.
Continue boiling the sauce until it reduces by half. Add the demi-glace to the sauce and continue boiling the mixture until it becomes slightly thickened. Remove the sauce from the heat and stir in the tarragon and softened butter.
Serve the chateaubriand, sliced on the diagonal, with the wine sauce and chateau potatoes.
This chateaubriand recipe make 2 to 3 servings.

Tartiflette Recipe


Reblochon cheese is at once tart and creamy. It’s a perfect addition to the smoky French bacon and potatoes in this homey casserole.
Prep Time: 15 minutes
Cook Time: 50 minutes
Ingredients:
2 tablespoons olive oil
1 cup chopped white onions
1/3 lb chopped Ventrèche, or smoked bacon
2 1/4 lbs cubed white potatoes
½ cup white wine
½ teaspoon salt
¼ teaspoon ground black pepper
1 lb sliced Reblochon cheese
Preparation:
Preheat an oven to 350F. Heat the olive oil in a large skillet over medium heat. Stir in the onions and cook, stirring occasionally, for 4 minutes. Add the Ventrèche and cook, stirring, for an additional 10 minutes. Add the potatoes, white wine, salt, and pepper; bring the mixture to a simmer, cover, and cook for 8 minutes.
Transfer the half of the potatoes to an oven-safe baking dish. Cover the potatoes with half of the Reblochon, and then repeat the layers once, ending with the last of the Reblochon on the top of the casserole. Bake for 25 minutes, until it is hot and bubbling.
Makes 6 servings.

Pear Tartlets Recipe


Served for dessert or afternoon tea, this deliciously spiced pear tartlets recipe is a quick and easy treat to make when you're in a rush. These spiced pear tartlets taste best when eaten within a few hours of being made. For the coziest indulgence, take a warm-from-the-oven pastry, dust it with a bit of powdered sugar, and serve it with a petite scoop of vanilla ice cream.
Prep Time: 10 minutes
Cook Time: 30 minutes
Total Time: 40 minutes
Ingredients:
1 sheet puff pastry
2 tablespoons granulated sugar
2 tablespoons brown sugar, packed
1 teaspoon cornstarch
1/2 teaspoon ground cinnamon (substitute 1/4 teaspoon grated nutmeg)
3 firm, ripe pears, peeled and thinly sliced
1 tablespoon coarse sugar or raw turbinado sugar
Preparation:
Preheat the oven to 375F. Cut the puff pastry and fit it into 6 lightly greased individual tartlet molds. Trim the excess pastry from the edges, leaving 1/2 inch overhang to fold over the filling.
In a medium bowl, stir the granulated sugar, brown sugar, cornstarch, and ground cinnamon or nutmeg until they are thoroughly blended. Gently toss the sliced pears in the sugar mixture.
Divide the sugar-spiced pears among the prepared tartlet molds and fold the edges over the pears. Sprinkle the pastries with the coarse sugar. Arrange the tartlets on a baking sheet and bake them in the preheated oven for 30 to 35 minutes, until they turn golden brown and the pears are tender.
Allow the spiced pear tartlets to cool for at least 30 minutes and serve them warm or at room temperature.
This pear tartlets recipe makes 6 servings.

Pain au Chocolat Recipe


Imagine this pain au chocolat recipe, fresh from the oven. It's golden and just slight crispy on the outside, with melted chocolate swirled throughout the buttery pastry. These delicious treats, also commonly known as pain au chocolate, are a delight with coffee for a simple, yet luxurious breakfast.
Prep Time: 3 hours
Cook Time: 15 minutes
Total Time: 3 hours, 15 minutes
Ingredients:
4 teaspoons instant dried yeast
1/2 cup lukewarm water
3 1/2 cups bread flour
1/2 cup milk
1/3 cup granulated sugar
3 tablespoons butter, melted and cooled
1 1/2 teaspoons salt
1 cup butter, softened
9 ounces bittersweet or semisweet chocolate, coarsely chopped
1 egg
2 tablespoons milk
Preparation:
Dissolve the yeast in the warm water for 5 minutes. Add the bread flour, milk, sugar, melted butter, and salt to the dissolved yeast and water and mix the dough on medium speed for about 2 minutes. If the dough is too sticky, add 1 tablespoon of extra flour at a time, until the dough is just firm enough to fold a shape.
Shape dough into a ball and loosely cover it with plastic wrap. Allow it to rest at room temperature for 30 minutes. Roll the dough into a 10-inch by 15-inch rectangle, and then cover it loosely and allow it to rise for 40 minutes.
Brush the rectangle with the softened butter and then fold the dough into thirds, like a letter. Roll the long, thin rectangle back into the original 10-inch by 15 shape. Fold the dough into thirds, again, and then cover the dough with plastic wrap and allow it to rest in the refrigerator for 1 hour. Repeat this process one more time.
Using a sharp knife, cut the dough crosswise into 12 rectangles. Arrange 2 teaspoons of chopped chocolate across one of the short ends of the rectangle and fold that third of the dough over the chocolate, toward the center. Repeat the process on the opposite side of the dough, folding it over and tucking the end under to create a cylindrical shape.
Arrange each finished pain au chocolate on a lightly greased baking sheet with at least 1 1/2 inches between each pastry. Cover them loosely with plastic wrap and allow them to rise for 45 minutes to 1 hour, until they are nearly doubled in size.
Preheat the oven to 400F. Whisk the egg and 2 tablespoons milk together to make an egg wash. Brush the egg wash across the surface of each pastry. Bake the pan au chocolate for 12 to 14 minutes, until they are puffed and golden brown.
This pain au chocolate recipe makes 12 servings.

Halibut Provencal Recipe


This halibut Provencal recipe, a classic French dish, features the bright flavors of Provence: garlic, shallots, fennel, tomatoes, olives, and fresh sage. Serve the seasoned fish, along with a generous helping of the pan sauce, over couscous or rice. Have a light lemon tart for a refreshing finish to the meal
Prep Time: 5 minutes
Cook Time: 30 minutes
Total Time: 35 minutes
Ingredients:
3 tablespoons extra virgin olive oil
1 clove garlic, pressed
¼ teaspoon dried red pepper flakes
2 shallots, sliced
1 fennel bulb, chopped
1 14-oz can seasoned tomatoes
½ cup bottled clam juice
12 black olives, pitted
1 1/2 lbs halibut, cut into 3-inch pieces
½ teaspoon salt
¼ teaspoon black pepper
1 tablespoon fresh sage, cut into fine strips(chiffonade)
Preparation:
How to make halibut Provencal:
Preheat the oven to 400 degrees.
Heat the olive oil in a deep ovenproof skillet over medium heat, and sauté the garlic and red pepper flakes for 1 minute. Add the shallots and fennel; cook for 5 minutes. Add the seasoned tomatoes and clam juice. Simmer for an additional 5 minutes until fennel is tender and liquid is slightly reduced. Remove from heat and stir in the olives.
Season the halibut with salt and pepper, and then arrange over hot tomato mixture in skillet. Bake in preheated oven for 17-20 minutes, until fish is cooked through. Stir the sage chiffonade into the hot vegetable mixture and serve.
This braised halibut Provencal recipe makes 4 to 6 servings.

Cheese Tart Recipe


This cheese tart recipe makes for a quick party appetizer. It's wholesome and filling served alone, or add a salad and soup to make it a complete meal.
Prep Time: 10 minutes
Cook Time: 18 minutes
Chill: 2 hours
Total Time: 2 hours, 28 minutes
Yield: 4 to 6 servings of cheese tart
Ingredients:
1 3/4 cups all-purpose flour
8 tablespoons cold butter, cut into pieces
1 teaspoon salt
2 tablespoons cold water
2/3 cup crumbled goat cheese
1/2 cup crumbled bleu cheese
Preparation:
How to make tarte au fromage:
Using a food processor, pulse the flour, butter, and salt until it has a coarse, sandy texture with a few pea-size bits of butter remaining. Stir the cold water into the flour mixture just until the dough pulls together into a shaggy ball. Wrap the dough in plastic wrap and refrigerate it for 2 hours, or until it is cold.
Preheat the oven to 400F. Divide the dough in half and roll each piece into an 4-inch by 6-inch oval shape, building up the edges slightly, on a lightly greased baking sheet.
Spread the crumbled cheese over the surface of the dough. Bake the cheese tarts for 12 to 18 minutes, until the dough is golden brown and cheese browns a bit and bubbles.
This cheese tart recipe makes 4 to 6 servings.

Sage Brown Butter Sauce Recipe


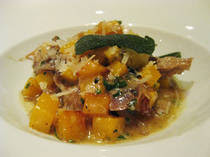
Rich and savory sage brown butter sauce is a quick way to dress up roasted poultry, pasta, and vegetable dishes. It tastes especially luxurious drizzled over caramelized butternut squash or simple mashed potatoes.
Prep Time: 3 minutes
Cook Time: 5 minutes
Total Time: 8 minutes
Yield: 4 to 6 servings
Ingredients:
8 tablespoons butter (1 stick)
1 clove garlic, crushed and chopped
1/4 cup coarsely chopped sage leaves
1/8 teaspoon ground black pepper
Preparation:
How to make sage brown butter sauce:
Melt the butter in medium sauce pan set over low-medium heat. When the butter begins to get just slightly bubbly, add the chopped garlic clove.
Stir the garlic in the butter for 1 minute. Add the chopped sage to the garlic butter and continue stirring and cooking the mixture for 1 to 2 additional minutes, until the butter has turned very light brown and has a rich, nutty aroma.
Season the sage brown butter sauce with ground black pepper and serve it hot.
This sage browned butter sauce recipe makes 4 to 6 servings.

Epoisses Cheese and Apple Tart Recipe


This country cheese and apple tart recipe from Burgundy is made with Epoisses cheese and pate brisee. Epoisses is made by monks at the abbey of Citeaux and was reportedly adored by Napoleon. In a pinch, Muenster cheese can be used as a substitute, but it does remove the authenticity of the dish. This tart is an incredibly easy and nutritious dinner to make when you’re in a rush.
Prep Time: 10 minutes
Cook Time: 55 minutes
Total Time: 65 minutes
Ingredients:
Pate brisee for a single crust
3 eggs
1/4 cup crème fraiche (substitute sour cream)
8 oz. Epoisses cheese, diced (substitute Muenster cheese)
1 1/2 cups coarsely chopped sweet-tart apples
2/3 cup chopped, fully cooked ham
1/2 teaspoon salt
1/4 teaspoon ground black pepper
1/8 teaspoon grated nutmeg
Preparation:
Preheat the oven to 400F.
Fit the pastry dough into a 9-inch round, deep-dish pie pan or miniature tart pans and trim and flute the edges. Set the prepared pastry aside.
In a large bowl, beat the eggs and the crème fraiche together. Stir in the cheese, apples, ham, salt, black pepper, and nutmeg. Pour the egg mixture into the prepared pastry and bake the 9-inch round pan for 10 minutes or the tartlets for 4 minutes. Reduce the heat to 350F and continue cooking the 9-inch round pan for 40 to 45 minutes or the tartlets for 10 to 15 minutes.